Alright, to add some interest into the Microsoft Comic Chat that a lot of us have been using and to make it more interesting, I decided to make a tutorial for getting the character editor for the program to work on newer machines. I will list step-by-step everything I did to run it as well as all the minute details about the program you'll probably need to keep in mind.
First, download the program from here. That site also has the chat program, characters, and backgrounds as well if you'd like to download those as well.
Next, run the installer.
![Posted Image]()
You don't actually need to close anything out. Just proceed as normal until you get an error.
Now when this error comes up, copy the link it has and paste it in the address bar of an explorer window. It says it can't find the file, but all the files are there.
![Posted Image]()
Copy the files over to a new folder. You can delete this folder when you're done, since it's just to store the files until the installer's done.
Now just press cancel and yes several times. It'll take a while.
Now go to the folder it was installed in (usually Program Files\Microsoft Chat Character Editor). You may find a few files that made it. The rest were denied access. Those are all in the new folder, so just move the files in that folder back into the program folder and allow access yourself.
The program still won't run properly right now because it needs to be in compatibility mode to actually do anything. Right-click the program file (ccedit.exe), choose "properties," select the compatibility tab, and set it to run in compatibility mode for Windows 98.
![Posted Image]()
It should run fine now, just don't choose open and just click the character editor files as an alternative. It'll close otherwise. If there are any problems with that or you know of a better way, let me know and I'll adjust this section.
----------------------------------------------------
Now the program itself. It's actually relatively simple to use, as it's pretty much MS Paint with actions attached. Start up the program and choose "New" to get started.
![Posted Image]()
Fill in all the information you need. The explanations are at the top. One thing to keep in mind is that there's also no alpha channel, hence why you need to choose a transparent color instead. Every image from the clipboard with transparencies will turn them black when pasted into the program. Everything else is explained, make sure to read everything is says on the window because it's all pretty important.
The program starts us with a neutral pose. Let's put this picture of Sonic in there. Also, "Import" closes the program like "Open" does, and I have no idea what it's supposed to do anyway, so just copy/paste the image from an image editor or such. You can also just draw it if you want.
![Posted Image]()
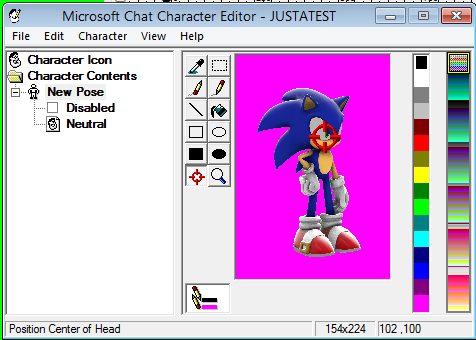
Remove this green screen, add the head center marker (red crosshair in the bottom-left of the tools) and we got ourselves a pose. I'm not gonna try that hard right now because this is just for an example and I don't even have all of the poses right now.
![Posted Image]()
We can either make a whole new pose or add another emotion to an existing pose. Let's add another pose, so go to "Character" and choose "Add Pose" or just press Ctrl+P.
![Posted Image]()
Here we have a field for the pose name and the emotion we want it associated with first. The emotions from Laugh to Coy have an intensity determined by where the marker is placed when using the character, with 1 being the most intense and is furthest from the center and 10 being closest. Here are the emotions:
Neutral: When the marker is in the center or you simply don't move the marker after sending a message. While other emotions can only have one pose associated with it, you can have multiple neutral poses that the program will cycle through.
Laugh: Self-explanatory. Will also trigger highest intensity when "lol" is typed.
Bored: Self-explanatory. Nothing I know of will trigger this via text.
Angry: Self-explanatory. Same as above.
Happy: Self-explanatory, triggered by a happy face emoticon
Scared: Self-explanatory.
Shout: LOTS OF YELLING. TYPING IN ALL CAPS TRIGGERS HIGHEST INTENSITY
Sad: Self-explanatory, triggered by a sad emoticon
Coy: Smug
Point To Self: This one can only be triggered by text. It's triggered by a sentence starting with "I."
Point To Other: This can also only be triggered via text, with this one being any sentence with "you" in it.
Wave: This one's only triggered with greetings and farewells, such as "hello," "hi," "bye," etc.
Other than Neutral, you cannot have more than one pose for an emotion('s specific intensity), so find a good one to use for each.
When you got all the poses you want set to the emotions you want, you will also need a character icon for the first comic panel and the user list on the side, which is as simple as creating the character, just really tiny and without a transparency color
![Posted Image]()
----------------------------------------------------
Now, there's one more important thing to do before we're done. In order for others to see it instantly, we need to set up an automatic download link. There are multiple ways to do this, but I use Dropbox for this out of convenience. Here's what I did:
Go to File->Make a Character File (.AVB), then change the file destination to Dropbox.
![Posted Image]()
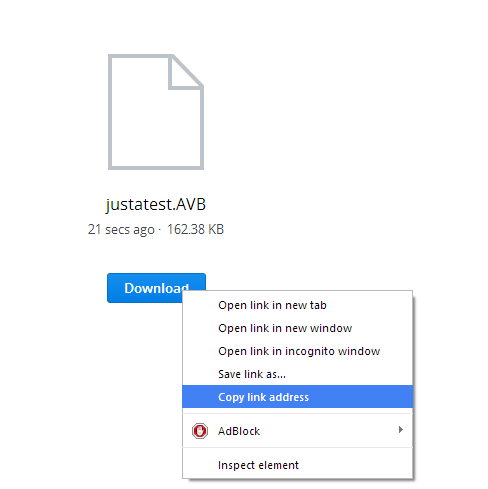
Now go to the Dropbox share link for that file, right-click the download button, and select "Copy link address."
![Posted Image]()
Go back to the character editor, go to File->Properties, paste it into the field for "Characters' URLand delete everything after the .AVB. I'm fairly certain I forgot that last step when I tried to help Probo with this part. Sorry. Scratch that, I just tested leaving the URL intact and apparently it worked, but not for Probo. Will update later.
![Posted Image]()
Click "OK" and create the character file again, making sure it'll overwrite the first one. Now it's replaced with the version with the link, allowing everyone to download the exact same file you have so when they use it, others can still download it.
![Posted Image]()
It's now ready to use! Just find it in the character list and give it a go. I tested this entire process on another computer just in case, so if there are any strange unknown problems on another end or there's some better way to do one of these steps under normal circumstances, just let me know.
Now someone please make Robotnik.
First, download the program from here. That site also has the chat program, characters, and backgrounds as well if you'd like to download those as well.
Next, run the installer.
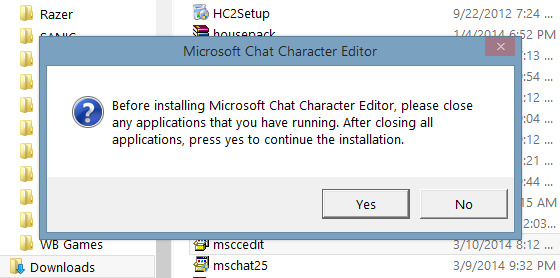
You don't actually need to close anything out. Just proceed as normal until you get an error.
Now when this error comes up, copy the link it has and paste it in the address bar of an explorer window. It says it can't find the file, but all the files are there.

Copy the files over to a new folder. You can delete this folder when you're done, since it's just to store the files until the installer's done.
Now just press cancel and yes several times. It'll take a while.
Now go to the folder it was installed in (usually Program Files\Microsoft Chat Character Editor). You may find a few files that made it. The rest were denied access. Those are all in the new folder, so just move the files in that folder back into the program folder and allow access yourself.
The program still won't run properly right now because it needs to be in compatibility mode to actually do anything. Right-click the program file (ccedit.exe), choose "properties," select the compatibility tab, and set it to run in compatibility mode for Windows 98.
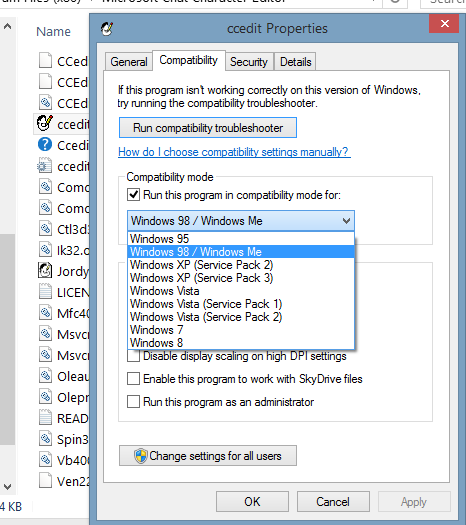
It should run fine now, just don't choose open and just click the character editor files as an alternative. It'll close otherwise. If there are any problems with that or you know of a better way, let me know and I'll adjust this section.
----------------------------------------------------
Now the program itself. It's actually relatively simple to use, as it's pretty much MS Paint with actions attached. Start up the program and choose "New" to get started.
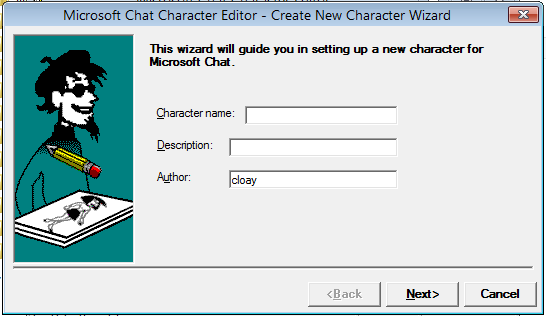
Fill in all the information you need. The explanations are at the top. One thing to keep in mind is that there's also no alpha channel, hence why you need to choose a transparent color instead. Every image from the clipboard with transparencies will turn them black when pasted into the program. Everything else is explained, make sure to read everything is says on the window because it's all pretty important.
The program starts us with a neutral pose. Let's put this picture of Sonic in there. Also, "Import" closes the program like "Open" does, and I have no idea what it's supposed to do anyway, so just copy/paste the image from an image editor or such. You can also just draw it if you want.
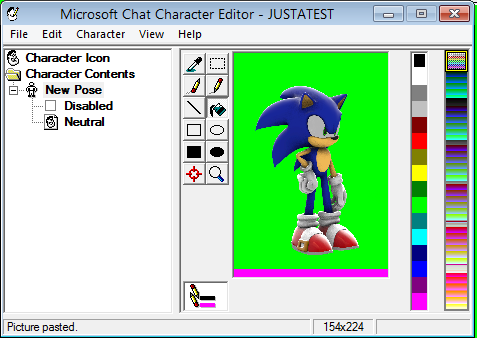
Remove this green screen, add the head center marker (red crosshair in the bottom-left of the tools) and we got ourselves a pose. I'm not gonna try that hard right now because this is just for an example and I don't even have all of the poses right now.
We can either make a whole new pose or add another emotion to an existing pose. Let's add another pose, so go to "Character" and choose "Add Pose" or just press Ctrl+P.
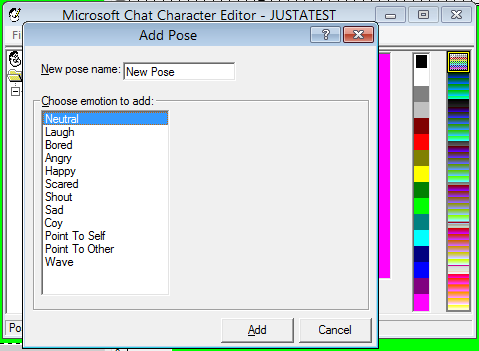
Here we have a field for the pose name and the emotion we want it associated with first. The emotions from Laugh to Coy have an intensity determined by where the marker is placed when using the character, with 1 being the most intense and is furthest from the center and 10 being closest. Here are the emotions:
Neutral: When the marker is in the center or you simply don't move the marker after sending a message. While other emotions can only have one pose associated with it, you can have multiple neutral poses that the program will cycle through.
Laugh: Self-explanatory. Will also trigger highest intensity when "lol" is typed.
Bored: Self-explanatory. Nothing I know of will trigger this via text.
Angry: Self-explanatory. Same as above.
Happy: Self-explanatory, triggered by a happy face emoticon
Scared: Self-explanatory.
Shout: LOTS OF YELLING. TYPING IN ALL CAPS TRIGGERS HIGHEST INTENSITY
Sad: Self-explanatory, triggered by a sad emoticon
Coy: Smug
Point To Self: This one can only be triggered by text. It's triggered by a sentence starting with "I."
Point To Other: This can also only be triggered via text, with this one being any sentence with "you" in it.
Wave: This one's only triggered with greetings and farewells, such as "hello," "hi," "bye," etc.
Other than Neutral, you cannot have more than one pose for an emotion('s specific intensity), so find a good one to use for each.
When you got all the poses you want set to the emotions you want, you will also need a character icon for the first comic panel and the user list on the side, which is as simple as creating the character, just really tiny and without a transparency color
----------------------------------------------------
Now, there's one more important thing to do before we're done. In order for others to see it instantly, we need to set up an automatic download link. There are multiple ways to do this, but I use Dropbox for this out of convenience. Here's what I did:
Go to File->Make a Character File (.AVB), then change the file destination to Dropbox.
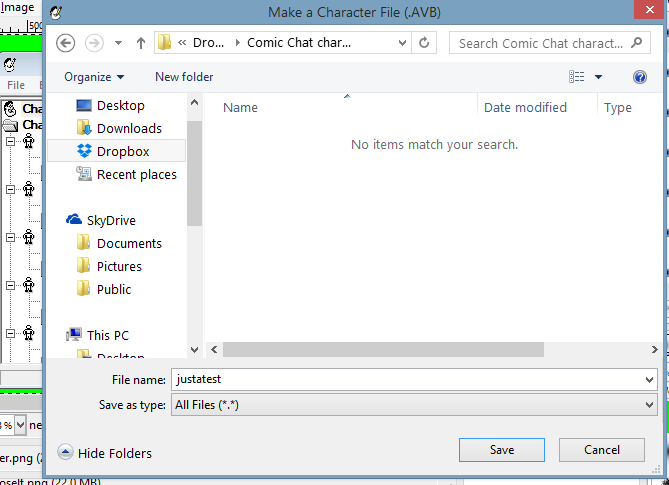
Now go to the Dropbox share link for that file, right-click the download button, and select "Copy link address."
Go back to the character editor, go to File->Properties, paste it into the field for "Characters' URL
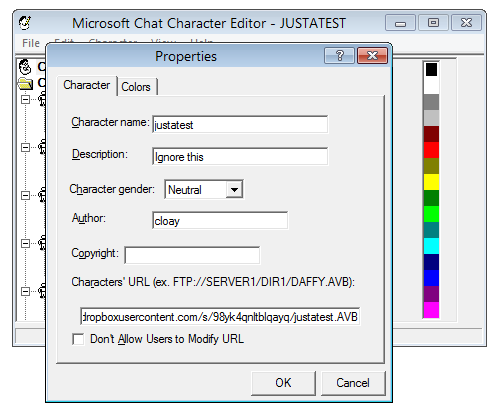
Click "OK" and create the character file again, making sure it'll overwrite the first one. Now it's replaced with the version with the link, allowing everyone to download the exact same file you have so when they use it, others can still download it.
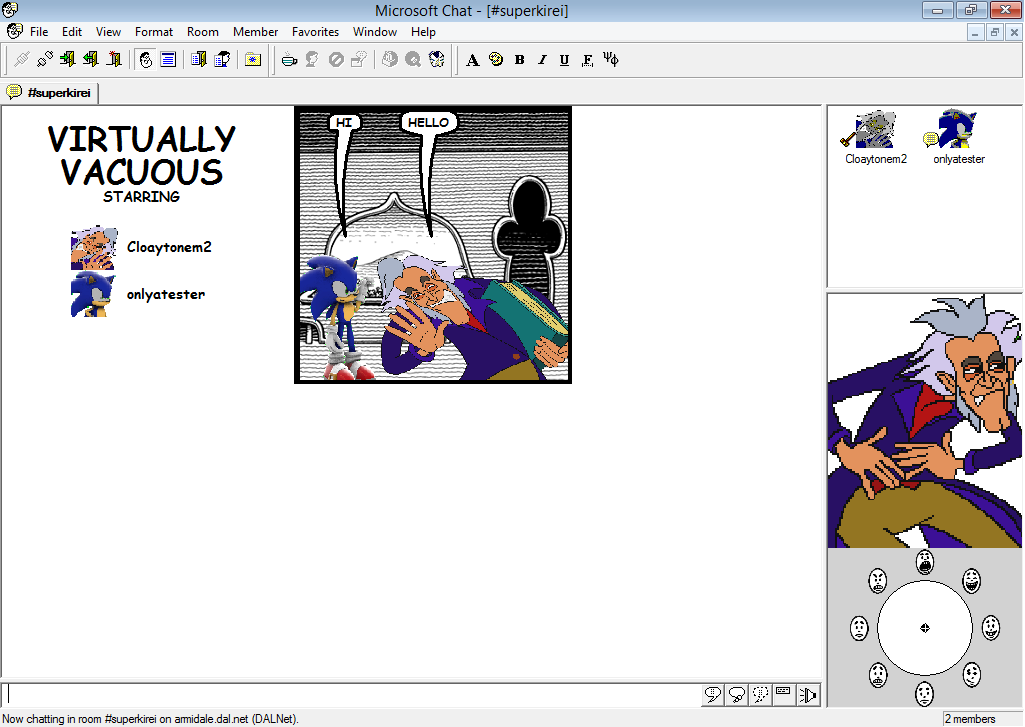
It's now ready to use! Just find it in the character list and give it a go. I tested this entire process on another computer just in case, so if there are any strange unknown problems on another end or there's some better way to do one of these steps under normal circumstances, just let me know.
Now someone please make Robotnik.